Friday, April 29, 2016

Bratty dogs are as bad as bratty kids


My darling dog Joey would rule the roost if I let him.  As an example, when I was trying to train him not to jump on people the inevitable response I got from the jumpee was "oh, that's ok, he's SO CUTE".

Well, it wasn't ok and if he had weighed 60 pounds rather than 14 I'm sure they wouldn't have thought so either.

Cute, right?


It is doggy nature that if the pet owner isn't in charge?  The dog is forced to take that position because someone has to do it!

Never have been able to understand why pet parents (or human ones for that matter) accept rude and objectionable behavior from their pets (or their kids).  A dog that is well trained (okay, so Joey has a ways to go) is a joy to have around.  You can take them places, enjoy their company in your home and they are secure in their knowledge that you are in charge.  And, believe me, if you don't take charge you will force them to cause "someone's gotta do it"!

There are many ways to help your dog understand where they rank in the pack order - I'm not talking beating the dog if it does something incorrect - that is totally counterproductive any way you cut it.

Obedience training is a wonderful bonding experience for both of you  (teaches you to endure public humiliation along the way).  It also helps your pup get used to other dogs and a range of people and environments.

http://www.yourpurebredpuppy.com/training/articles/dog-respect-training.html

This post isn't meant to do more than give you an idea of some of the things that are not acceptable if you are thinking of getting a pup (or even an older dog) and easy ways to help the situation.

Once I get my mind off where to plant the parsnips and when can I put in the carrot seeds I might digress into some other ways to make your pack a happy one.

In the meantime just remember - if it ain't cute at 50 pounds, it's not at 10 pounds and if you don't want to spend the rest of your pet's life wishing he would STOP DOING THAT, now is the time to fix it!

PS  I'm not selling the video that's in the link but the questions and answers in the article are spot on!

Tuesday, April 26, 2016

Hopeful signs...


I admit it - I have been known to plant a row of vegetable seeds and after waiting what I think is a reasonable time (which has nothing to do with what it says on the seed package) and not seeing any results I sort of dig around in the row to see what's happening.  Alright, I dig up some of the seeds - it's not like I rape the row or anything - I just want to make sure things are doing ok!

This spring has been an exception to the rule (pretty much) - most of what I've planted so far has practically leaped out of the ground!  I was especially excited to see the onion seedlings.  I was sure that I had planted the seeds too early and that the cold snap had destroyed any hope of their survival.  I'd not tried onions from seed before and was really bummed.

Then the other day I noticed that they were not only up, they were up more than an inch.  Very hard to see (as you can tell from the picture) cause they are very thin but there they were.  It may not look too impressive considering that the little pebbles in the soil look bigger than they do but bear with me here - I thought they were dead.  Admittedly you have to have your nose almost on the ground but they are visible.


Tiny baby onion seedlings


You can almost always count on the peas to come up - last spring I actually crawled over a snow bank to plant them and was harvesting peas before the end of June.  This year I planted in the first week of April and they are up and growing just like they are supposed to - very gratifying.


And you don't even have to bend over to see them!

The other item that absolutely sprang out of the ground is the beets.  Now honesty compels me to admit that I have totally sucked at raising beets in the past.  I don't know if it was the soil or the seeds or the watering or the too much watering but I never had much luck.  This year is the first time I've even had a good germination rate.  So naturally in my mind I am already putting up pint after pint of pickled beets - a family favorite.


The seedlings that look like butterfly wings are actually radishes - planted as a row marker.

The lettuce and radishes I planted in the brown planter are up but even I don't think you can see them in a picture - I only can cause I know they are there but soon I hope they will have grown big enough to have you believe me.  Below is what things looked like last year so I have high hopes for a repeat in 2016.


All of the above is just the reaffirmation that I look for every spring:  the gardens are growing, the plants will produce and the woodchuck froze to death over the winter.  Alright, I know that's not nice but it's from the heart.  Once you have seen a row of plants (it was carrots last summer) that you have nurtured and babied and watered and hope to actually get to eat reduced to what appears to be a row of dirt you tend to develop a somewhat uncharitable attitude towards whatever did the deed.  And as far as I'm concerned any varmint that actually eats zucchini plants and leaves is just asking to get relocated.  Hey, I had to BUY zucchini or bum them from my friends last summer just to make the zucchini relish that everyone loves so much. 

So at least short term my optimism is in high gear and I hope I have inspired at least a few of you to get a pot and some seeds and get it done!


Monday, April 18, 2016

Watch your head isn't always about ducking


I always liked tales about long ago that started off "it was a dark and stormy night".  Would love to have used it here but aside from being dark that night wasn't stormy at all.

It was a night on a road that had recently been repaved and back in the day that meant a lot of sand.  I think probably they actually oiled it?  and then sanded the hell out of it and let the vehicles driving on it grind the sand into the oil and make it "pavement".  Not really sure.

I do know that it was one of the times that my brother was wearing "the helmet" so I was wearing a head scarf, corduroy jacket, jeans and riding on the back of his buddy's bike.  As opposed to the back of my brother's bike where I usually perched.

We had been running errands around town and were heading back on a road we had recently come over.  I almost mentioned to my driver to remember the corner and the sand but didn't want to be a wimp.  I have since gotten over that - if I have something to say to anyone who holds my life in their hands I say it!

The short version is obviously my driver was memory impaired, we slid, we went down and I remember starting to spit the sand out of my mouth and not much else until the emergency room visit.

I was banged and bruised and scraped but I only had a "minor" concussion.  And that is the real message I want to pass along here.  Technically there might be such a thing as a minor concussion - in reality not so much.  At the time I had two small children and once I got out of the hospital I discovered that I was incapable of deciding how to dress them in the morning or what to make them for lunch.

Now that's a small issue you say?  Not when it reaches the point that someone has to lay out the lunch materials for you every day or else you end up dissolved in tears and completely unable to pick out the food to feed your kids!

Oh, and when you open your mouth to speak?  It's very interesting to see what comes out - because it bears no resemblance to what you intended to say.  Worse yet you can't remember the right word, you just know that the one that came out is wrong.  And this went on for much longer than it took my face to grow a new set of skin.

If I had been wearing a helmet when I hit the pavement I am pretty sure that I would still have been banged and scraped but I would have been more than able to make the decision between peanut butter and fluff or scrambled eggs going forward.

I think that incident (among other things) was instrumental in my deciding to ride my own motorcycle - at least then I could pretty much trust the driver's judgment!

Not all accidents can be avoided but play the odds and do the best you can to "watch your head"!


Friday, April 15, 2016

Vanishing skills


Says it so well!


The above is almost self explanatory but just in case you don't think so allow me to elaborate.  It seems to me there are a ton of fundamental skills that are disappearing in our modern world.  They still exist in some areas - mostly rural and/or poor - but mainstream culture appears to think that items like pickles spring full blown already in jars out of some alternate dimension.  Probably the same place that jam, relish, salsa and packaged chicken come from.

I had some younger friends who came to "class" a few years ago and learned to make jam and pickles and perhaps even garden a little.  Personally I think they were afraid that I would pass on to whatever reward awaits me taking the mystery recipe for strawberry jam and bread and butter pickles into oblivion with me.  Perhaps I do them an injustice and they just thirst for knowledge but for whatever reason they were excited to see how easy it is to preserve your own food.  

So being proactive they hedged their future Christmas gifts by learning to do it themselves.  And to tell the truth, other than having utensils that have been around for 50 years (and look it), I have no special kitchen secret squirrel items that I use to make all these things.

Everything from canning and preserving to drying (did I mention my jerky recipe?) - all can be easily done with a minimum of equipment in a regular kitchen.  As far as drying goes you don't even have to have a dehydrator although it's easier to control than using your oven or just hanging things up and hoping for dry weather.

This post is only meant to get you thinking about what you might want to tackle this summer and fall.  At least you would have a clue what went into the food you are eating and would also have the pride of knowing you got it done!


:


Monday, April 11, 2016

Got it!


Figured out the legs on the sifter - used some of the grade stakes and since I didn't want the legs to dig in I just reversed the stakes so they are pointy side up.

Sometimes I actually can think ahead!


Now to see if I thought far enough ahead - time will tell!


Sick of the rocks

You know? I can put soil/dirt/compost into a raised bed and over the winter many little rocks appear.  I don't know if one rock finds the bed and invites all its friends over or if the winter rains and snows wash the soil away and expose the rocks or if I just had lousy dirt to begin with.  I do know I'm sick of picking rocks out and throwing them across the road into the woods.  For one thing I never look before I throw and there are occasionally cars passing by on their way to discover what "Not a through way" means.

Anyhow, it seemed to me in my new found confidence from making the two new garden beds and actually repairing in situ one of the other ones, that making a little box screening thingie to get rid of some of those rocks should be doable.

For my more carpenter inclined readers I apologize for not being more expert but here goes (went).

Off to Home Depot for materials:  2 x 4 lumber, exterior corner braces and some 1/2 inch hardware cloth.  BTW,for the uninitiated, be advised that "hardware cloth" is wire mesh with an affinity for human flesh only exceeded by that of chicken wire.  It is handled at your peril!

I'm getting a bit smarter as I go along so I laid out the pieces of lumber that the nice man cut down for me before I started actually connecting them.  Good thing - when measured I had 2 pieces at 24 inches and 2 other ones at 23-1/2 inches.  Connecting in the wrong order would have been even further from a square than my usual results.

Even got smart and marked which ones went together

Gathered up the tools I'd need.
Tin snips - not optional!
Drill & bits, pencil, corners, wood & wire

Next on the discovery list was that the corner braces were interior, not exterior as I'd asked for - note to self:  look at stuff before  you assume it's correct.  

Interior corner braces
Frame assembled


Now to add the hardware cloth to the top of the frame and secure it in place without blood loss (mine) or escape (the wire).  It comes in a  tightly wound roll and is pretty resistant to unwinding and lying peacefully in place.  Ok, it's damn near impossible but if you are persistent it can be done.  One trick is to secure one side/end so it is square to the frame before you nail/staple it down.  I actually managed it pretty well (still no blood loss or escape) and then just needed to staple it all around before I cut the excess off.  Believe me that is where the tin snips come into their own - this is not stuff to try to conquer with side cut pliers -  been there/done that/bled quite a bit.

All ready to staple down and cut off excess


Got it all done!  Until I try it no telling how well it's going to function out in the real world but fortunately it's raining today so I can hang out inside and bask in optimism - which may or may not be justified!

Below is the top and bottom of the end result.  Am I annoyed that some of the joints aren't quite square or as tight as I'd like?  You bet - does it matter in the long run?  Probably not.  


Top


Interior
 There is something so cool about being able to make something useful and have it come out almost like the picture I had in my mind.  The rain finally stopped so I took it for a test drive.

Sifter at work
Results - no rocks!


I think I need legs/braces on one end to maintain a slant but haven't figured out how exactly to do it yet.   But right now I'm thinking it's a plan that worked and I got it done!


Saturday, April 9, 2016

And it's not plastic!


I know these work as advertised - was given one last year to carry water on the bike.  There are a ton of different styles & colors:


  • Keeps your drinks cold for 24 hours, hot for 12
  • 18/8 double-walled stainless steel, non-toxic, non-leaching and BPA free
  • 9oz & 17oz fit in a standard sized cup-holder
  • 25oz holds an entire bottle of wine
  • Bottles do not condensate
  • Mouth is wide enough for ice cubes and drip-free sipping
  • Vacuum sealed
  • S’well has teamed up with the U.S. Fund for UNICEF to help provide clean drinking water to children around the world

I guess that says it all - I do know that the 24 hour cold claim is valid - water (or whatever) comes out just as cold as you put it in - actually pretty amazing!


Above are just a few of the styles and colors but there are a lot more.


Pretty much something for everyone!

And it doesn't need a straw...just sayin!


Baby spring steps

Got out my "portable" container yesterday and filled it up with a combo of soil and compost - I put portable in quotes cause there's no way it's movable after it's full.  It does have wheels but this year it's not on the porch, it's down on the ground.  I found that putting it right up against the house let it get too hot for the lettuce and radishes I planted in it so down on the ground it goes.  Less reflected heat there and more air circulation.

Today I planted two kinds of lettuce and some radishes in it.  I have high hopes for the lettuce and not so much for the radishes.  Lettuce doesn't mind some cold weather but the radishes might have a few issues.

Got a couple of starting pictures to put on here - partly my point is that things don't have to look all neat and tidy to be a garden.  It's a good thing too cause my gardens (with the best of intentions) just seem to happen more than go according to script.

Portable container ready to sow.

Ready to sow - overflow opening on side


One thing I will tell you is that even with a small garden (and they don't get much smaller than this) put markers up to tell you what you planted where.  I know, you're sure you'll remember - you won't!

Portable container sowed with lettuce and radishes.


This particular container was part of a "system" that I bit on a couple of years ago - that pipe in the corner leads to a reservoir in the bottom where water can gather and wick up into the dirt. It even has an overflow opening so it doesn't just fill the whole thing up like a bucket.  It came with special instructions and special dirt and didn't work a bit better with all that than it did last year when I just filled it with regular garden soil.

It's chilly today with an east wind but nice in the sun.  I am always filled with hope when I start to plant my gardens - I imagine them flourishing and filling the beds to over-flowing.  And, have I mentioned, I hope the woodchuck died over the winter?

Anyhow, I will hover around waiting for some green to show (I have been known to dig up seeds that I thought weren't germinating fast enough for my taste just to see what is going on!) and hope to have more pictures to share in a couple weeks.

P.S.  And I even promise to share my failures just to save y'all some steps!


Friday, April 8, 2016

I turned down a straw

Something Jeff Bridges said in his video really stuck with me - plastic is a substance that the earth cannot digest. Think on that for a minute - the earth can digest almost anything - it can even digest rocks to a point given enough time. if you wait long enough the hardest rock will be worn down into tiny bits of sand.  But the straw that was lying next to that rock will still look like...well, a straw.

I'll keep this relatively short and sweet because I am nowhere nearly as eloquent as my great-niece Barbara Greene Alfeo (who write a blog as Sunshine Gorilla).  She is on a campaign to research renewable resources and companies who treat the earth kindly.  On the other hand she is young enough so she probably has the time to make an impact! I figure I'd better stick to things I can do in the short term. I do still buy green bananas so it's not all bad.

Last night I had supper with friends and when my diet Coke came (yeah, I know, that crap will kill me) it automatically came with an individually wrapped straw.  How hygienic.  I almost unwrapped it but a combination of Jeff Bridges and Barbara's voices reminded me that I was a big girl and didn't need a straw (or a sippy cup).  I didn't have the guts to ask the nice waitress to take it back but I left it in it's unused pristine state on the table when I left.

It's a tiny step for me but perhaps the trickle down effect will hold and next thing you know I'll be refusing plastic forks and spoons at the take out place!

Anyone who has paid the slightest attention must realize that our oceans (having been used as an adjunct to our sewerage systems for half of forever) are filled with frighteningly enormous quantities of plastic.  Hell, there are new "land masses" that are totally plastic - what more will it take to get our attention?  This plastic junk will be there long after the last of us are gone to whatever rewards await us.  And if "someone" is keeping track the payback is going to be something to see but not pretty.

This is a long way from container planting but I felt it was something I needed to say.  If we could all just think twice before we toss plastic in the trash (or even recycle it) or even use one ounce more of plastic than we absolutely have to just imagine the impact we could make!

One straw at a time!


Thursday, April 7, 2016

Pretty damn scary actually!


I have apparently finally figured out how to link a YouTube video to my blog - please let me know if you have any trouble running it!

Monday, April 4, 2016

A step over to the weird side!


I actually have heard of this sort of thing - mostly it was about chickens!  I doubt in our area we have to worry about it.  If a law hasn't been passed against ugly lawns (mine isn't really grass - it's just green stuff) I'm safe I think!  This isn't meant to be a political statement - just an example of what government can do if they get the bit between their teeth and no common sense to go along with it.


garden


A family in Sugar Creek, Missouri grew the beautiful vegetable garden in the photo above.
They’ve been given four days to tear out the entire garden or face a fine.
Why? Because it is in their front yard, and city officials and a few neighbors don’t like it.
Nathan Athans said he planted the garden in his front yard because it gets optimal sunlight. His backyard only gets sunshine for about two hours per day, and only in certain areas.
Athans told KSHB that he grows several different types of vegetables on his lawn and loves tending to his garden.
I’d probably say about 300 hours [so far this year], I spend all my free time out here.
I want my family to know where their food is coming from, I don’t want to have to go to the grocery store and worry about what was done to that food.Last summer, the city cited Athans for weeds in his garden, and he complied with the order to clean things up, and paid the fine.
But now, the city has passed a shiny new ordinance – one that Athans believes is part of a witch hunt against him.
The family started an online petition, which explains why they feel targeted:
The city of Sugar Creek, Missouri passed an ordinance two days ago on March 28th, forbidding front yard gardens to grow food, within the first 30 feet of front yard space from the street. Mayor Matt Mallinson both passed and approved this ordinance. They gave us until April 1st to comply. We are the only house in the city with a front yard garden, and just happen to be exactly within those first 30 feet. They have been targeting us since we moved in last year, because we grew a garden in the front yard.
The city’s building official, Paul Loving, told KSHB that city received many complaints and that the ordinance is their solution.
The petition goes on to explain the reasons the garden is so important to Athans and his family:
We believe in sustainability, growing our food locally without pesticides and excessive fertilizer use, reducing our need for fossil fuels to import produce from other countries, countries that have little or no regulations on pesticide use. Sugar Creek is also prone to flooding, as it is located next to the Missouri River, so using our yard for growing plants instead of grass is beneficial because our garden takes in water as well as holding the soil together to prevent erosion, all while filtering out pollutants. It has helped our basement not flood during storms, prevented storm water runoff pollution, reduced fossil fuel use, helped us eat healthier, and prevented us from consuming pesticides and GMOs.
Unfortunately, Athans isn’t the first to be subjected to harassment over growing his own food. People have been charged with crimes, threatened with jail time, and had their property destroyed for growing gardens in their own yards.
Remember, in the US, you never truly own anything.
Copied from the Daily Sheeple with permission.  


Sunday, April 3, 2016

A little out of sequence maybe...

After my last post I was all primed to start talking (I really hate the term "blogging" - sounds like indigestion or the dog about to throw up) more about container planting.  And in a way I suppose these are containers.

So here goes - once upon a time when I wasn't thinking things through (like half my life) I made two big garden beds on the side of the yard where it used to be all garden when the kids were young.  These two raised beds were about 8 x 12 feet with the predicable result that I couldn't reach the middle of either of them to cultivate or harvest without standing in the bed which compacted the soil - undesirable to say the least.  I mentioned this situation in passing in my first container gardening post.

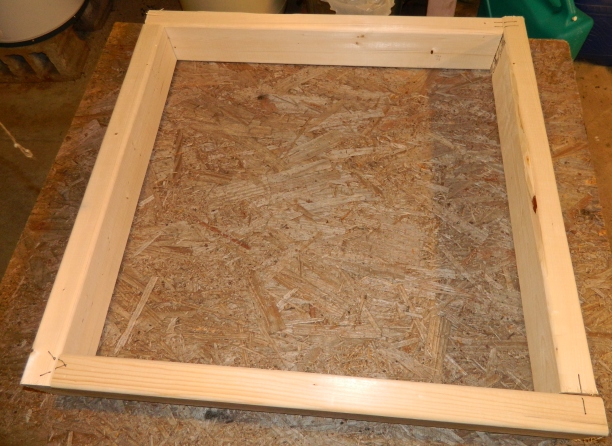
My project this past winter (that I finally got to) was to make replacement frames to turn that big garden into two smaller ones and also move them a bit further onto the lawn to get away from the encroaching evergreen tree.  I use rough lumber from Home Depot for my frames - it won't last forever but it doesn't cost a fortune either.  So when the crocus and snowdrops started blooming a few days ago I realized that if I was going to get these frames in place and filled I'd best get on the stick.

I've made them before and every time I learn something new.  This time it was to make sure I square off the ends of the planks before I start putting them together - I know - sounds pretty elementary but I'm no carpenter!  I did have some more advanced tools to work with.  A cordless drill - heaven! -  and a little chuck attachment that has a drill on one end and a screw driver on the other and you can just reverse it in and out of the drill chuck - like a quick disconnect - without having to go through the entire process of taking the drill out of the bit, replacing it with the driver and so forth and so on.  Made the whole project a lot easier.  My thanks to both of my sons for providing the new tools. Not to mention that this time I had a matching pair of saw horses. Last time I was using the washing machine for the second saw horse and that had some obvious drawbacks.


The plan was to make the frames in the cellar and then take them outside on a good day, prepare the spot for them and THEN put the stakes on that hold them in place.  There is something about dealing with sharp pointy things on an 8 x 2 foot unwieldy semi-flexible object that I try to avoid until it's pretty much a one shot deal.  Must less chance of impalement!

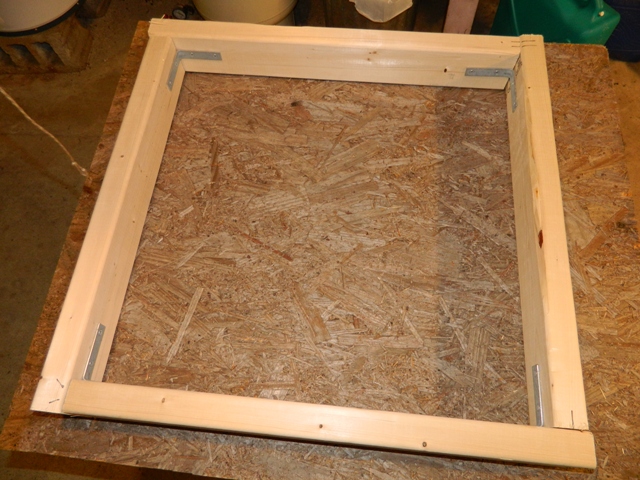
I've started using interior metal corner braces to hold the frames together in the hopes that they will work better than just screwing the corners using wood blocks on the interior.  For certain the metal will last and I hope the attachment will also.  I drill a pilot hole first and then just screw in the screws that come with the brackets.  Another thing I learned was to keep the brackets in reach of the clamp in the above picture so that I don't need 4 hands to put the last pieces together.  First time around was a real balancing act.


Once the frames are put together the next part of the process was pretty cut and dried - figure out where you want to set the bed (put the ugliest end towards the tree) and then dig a trench in the big bed for the end and the side of the new frame.  Since I was putting the new frame along an existing side of the old bed I only needed to dig two trenches.  Then put the frame in place and do some measuring to make sure it's parallel to the one next to it.  This usually means putting the frame in place several times and measuring and moving more dirt to get it in the right spot.   Then it's off to the porch to put the stakes in place.  I use 2 foot grade stakes that I get from Home Depot.


These beds were longer than I usually make so I used two stakes on each of the long sides and one on each end.  And it may sound elementary but make sure the stakes are all pointing in the same direction - don't ask me how I know to check!


Once it's in place balanced on the stakes (I wish I had a picture of that stage of the game) it's a matter of measuring again to make sure it's parallel (yeah, I'm anal) and then pounding the stakes in.  I'd suggest a mallet rather than a hammer to do the pounding cause the hammer would damage the frame wood.  Unless you have something to use to drive against the tops of the stakes you have to pound on the frame.  Getting it down to ground level and settled in usually means more digging along the sides.  I use a long level to get it level side to side and length-wise also.  I know it's not a piano I'm making here so half a bubble off is ok but if I had to look at something that was obviously not level or parallel it would make me crazy(ier).

You can see that the old bed doesn't come out as far as the new one so I did have to dig out some of the sod at the near end of the new beds.  I used dirt from the old bed to fill the new one at least partially (I will want to add some compost before I plant) and then it was a matter of putting in the second frame.


And there I am - with space to walk between the beds and the ability to reach everything in them without walking in them.  The extra dirt in back (gotta find a home for those chives that are already up) I will either use to fill up other beds or stockpile somewhere until I do need it.  I still need to rake out and seed in between the beds but the main work is done just in time for the snow today!

Although this is off track from true container gardening I thought if any of you are ready to jump ahead to raised beds this might give some food for thought.  In some ways what I did here was easier than starting from scratch and having to remove all the sod but you probably get the idea.

If I am fortunate and the woodchuck has mercy I will be able to post picture of all the wonderful vegetables I can get from these relatively small beds.  And by the end of the summer the wood will blend in just as well as the ones next to them do after just one winter!

Since comments are now allowed on the blog posts if any of the above raises questions I might be able to answer, feel free to ask them as a comment!

Next installment I will try to get back to pots and containers as promised (or threatened, depends on your perspective).